Quick Tip – turning strings into Geo-Coordinates for Amazon QuickSight

Some of my IoT projects report location data with messages that looks like this;

{
  "time": "20181007T071731Z",
  "kph": 0.01852,
  "alt": 140.1,
  "satellites": 11,
  "hdop": 75,
  "pos": [
    "47.64",
    "-122.36"
  ],
  "age": 379,
  "chk_f": 9,
  "chk_s": 46175,
  "fix": 10735
}

Notice how the co-ordinates are returned as an array of two strings where each string contains a decimal degrees value.

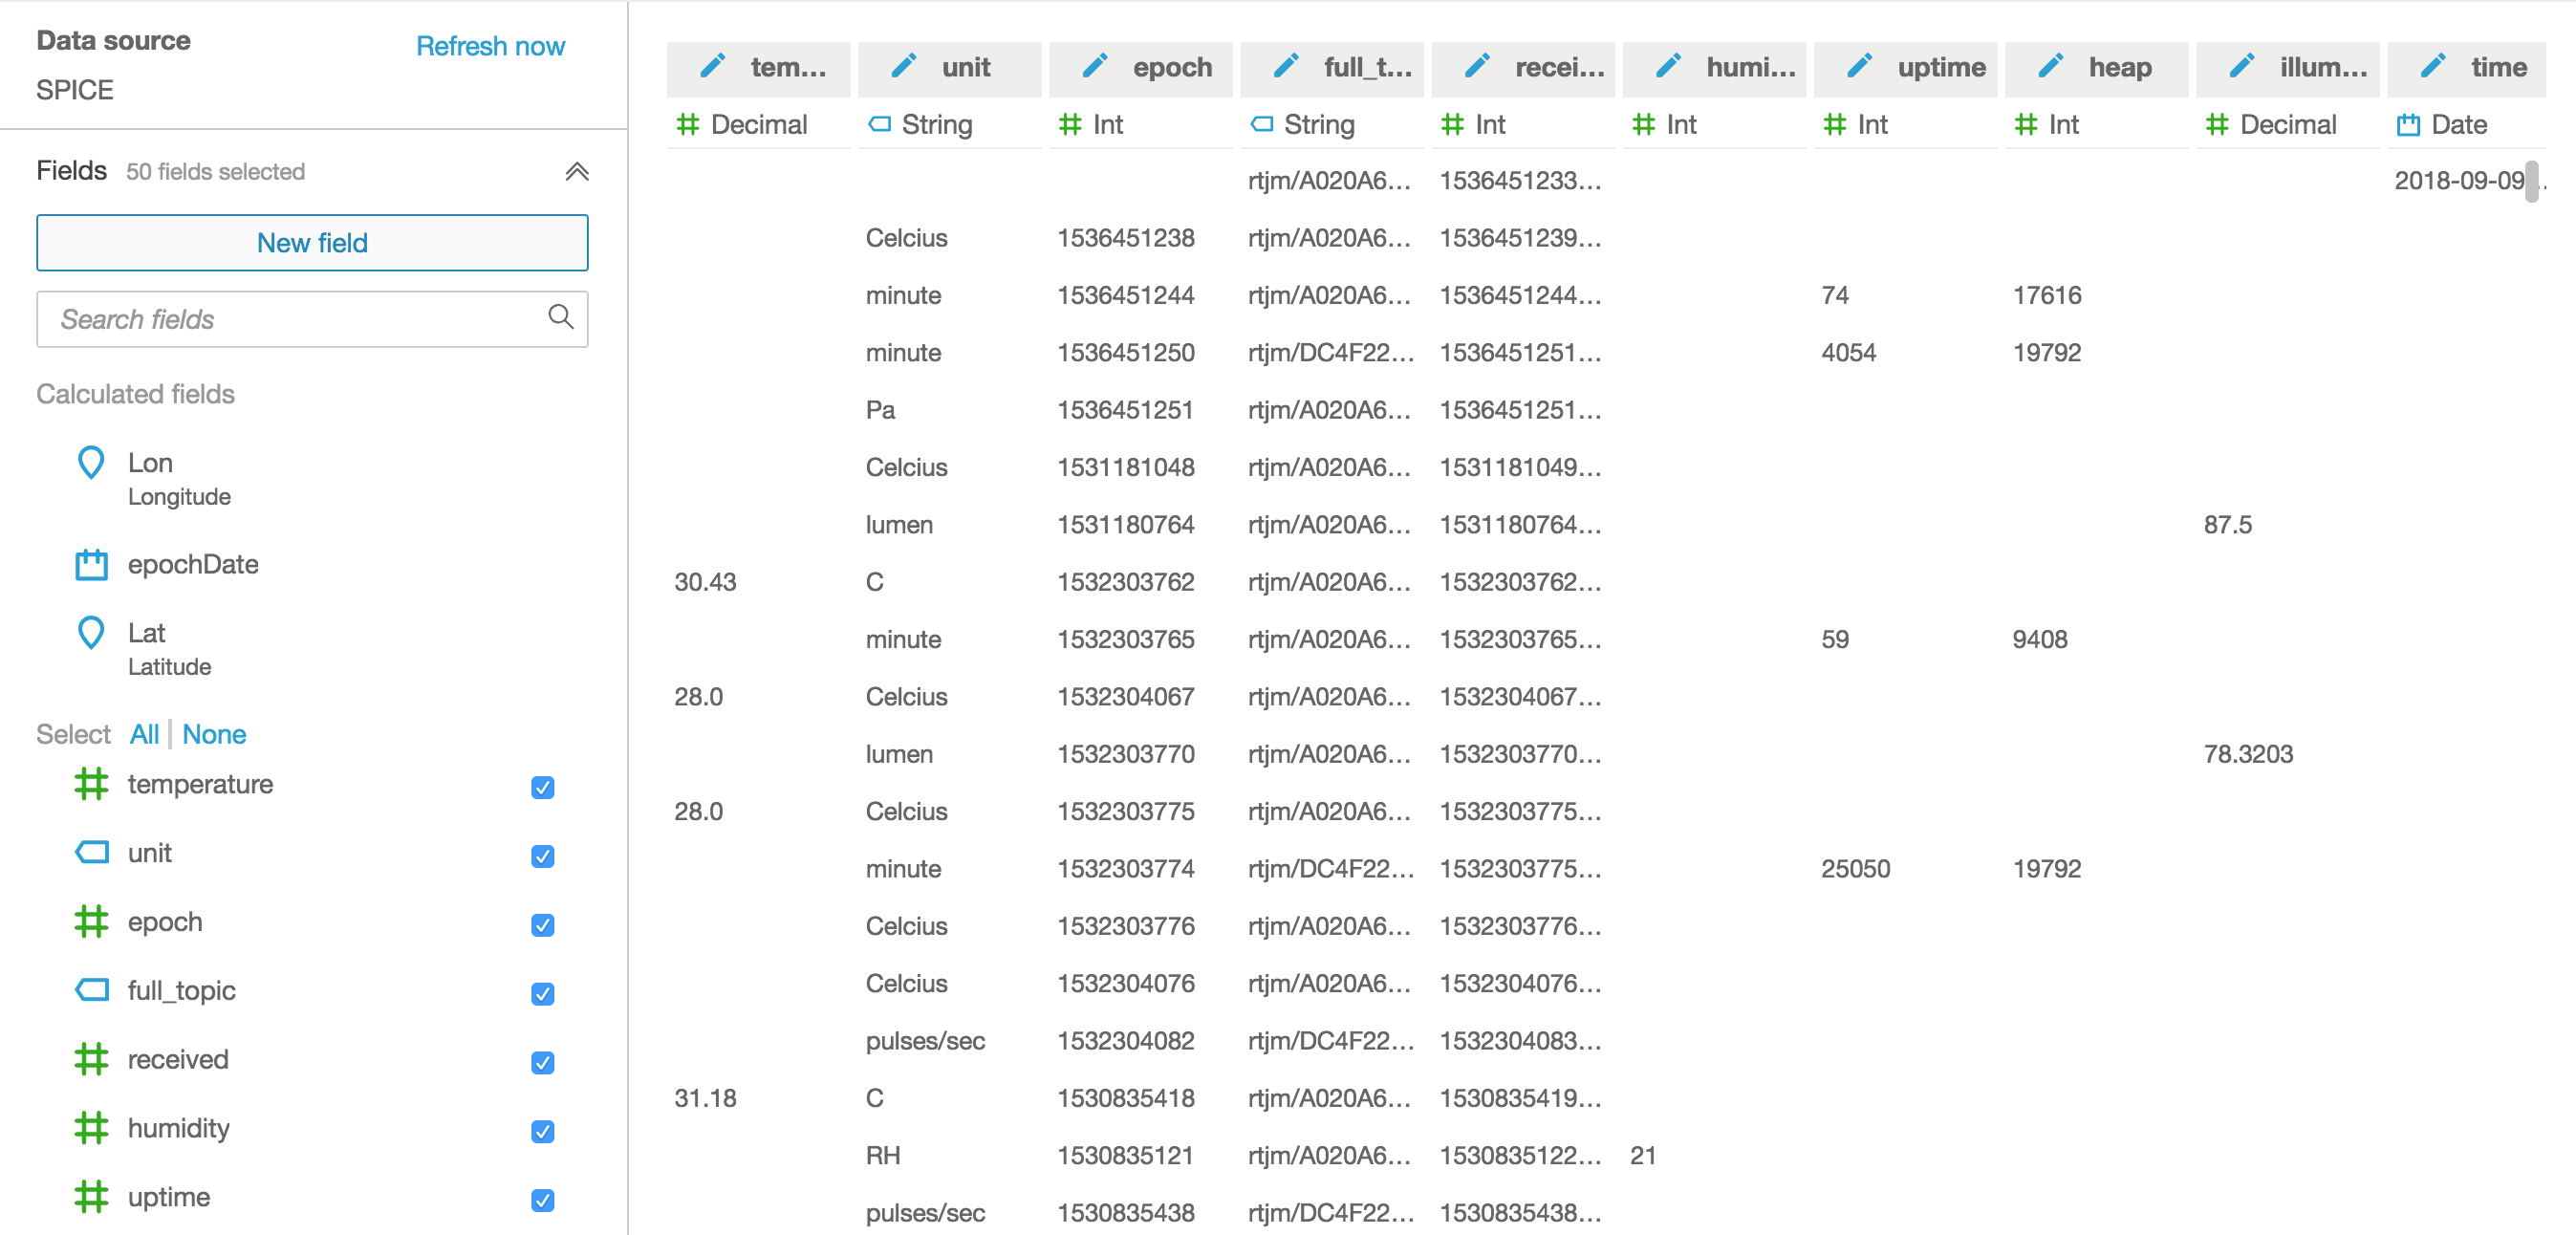
It’s clear what the data means, but for Amazon QuickSight to plot it on a map, it needs to have this coordinate expressed in the correct type – in this case a Geo coordinate.

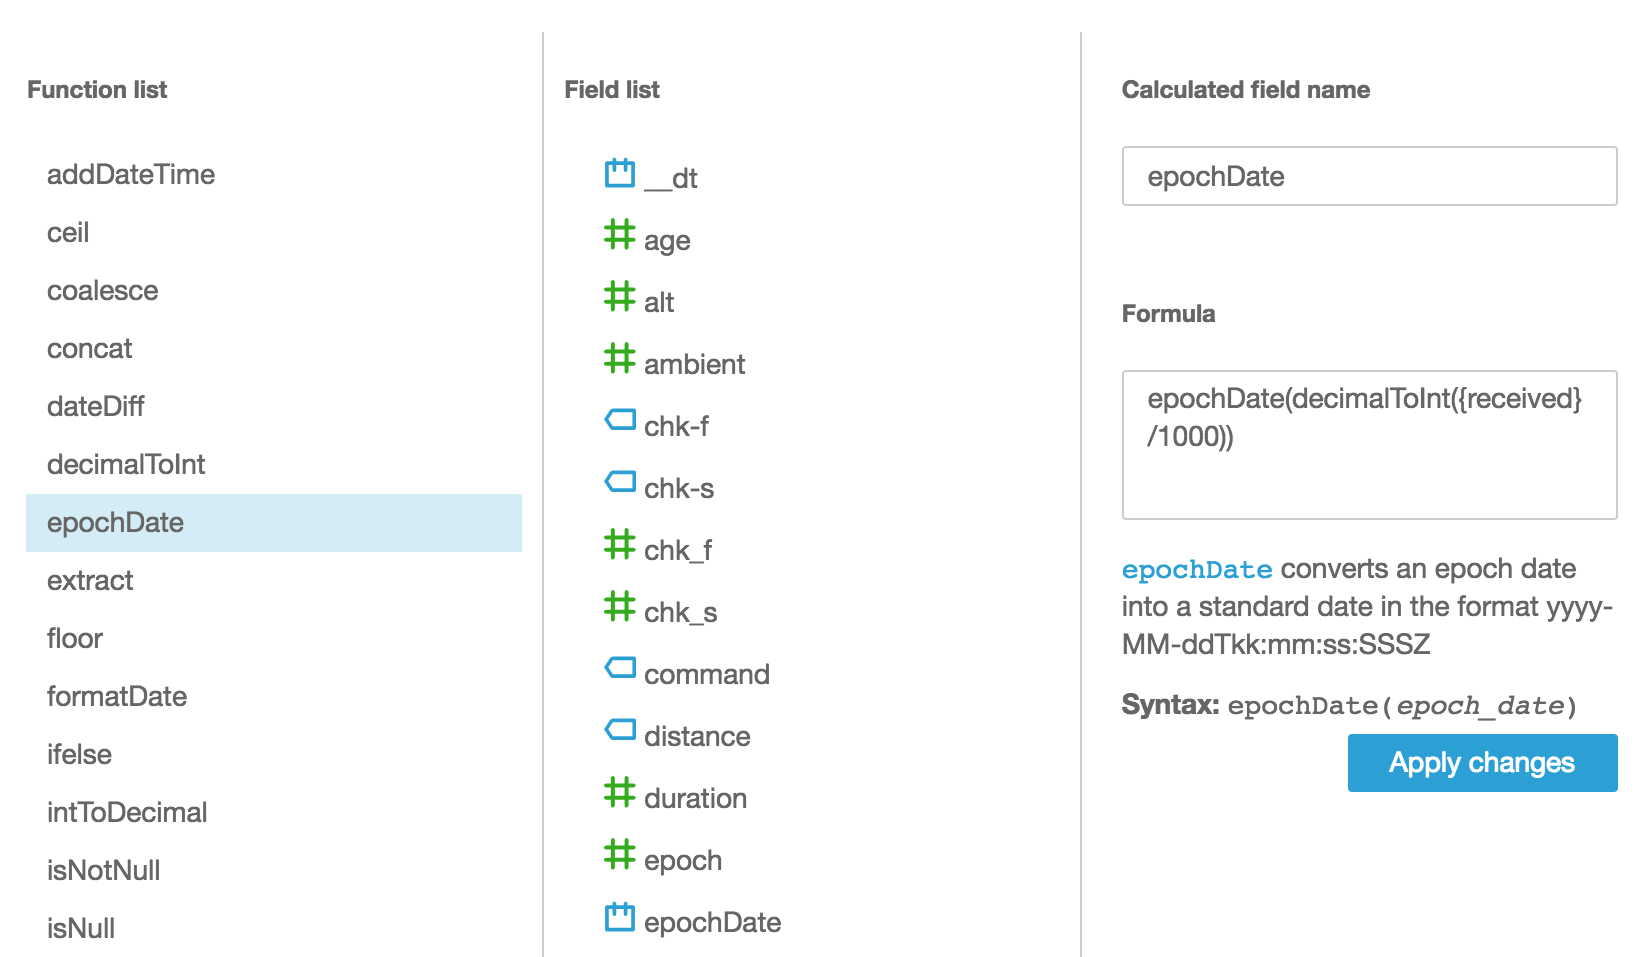
As I mentioned before, we can use a QuickSight calculated field to solve this problem. This time the formula we need is a little more complex but in essence we are going to split the string into 2 and use one part for a Latitude Geo Coordinate and the other for a Longitude Geo Coordinate.

Here’s the calculated field formula for the Latitude

parseDecimal(split(replace(replace({pos},"[",""),"]",""),",",1))

And here’s the almost identical one for the Longitude (which uses the second array value rather than the first)

parseDecimal(split(replace(replace({pos},"[",""),"]",""),",",2))

These calculated fields will be numbers to start with, we still need to tell QuickSight that we want to treat these as coordinates suitable for mapping, so  use the edit data type feature to convert them to the appropriate Geo type like this.

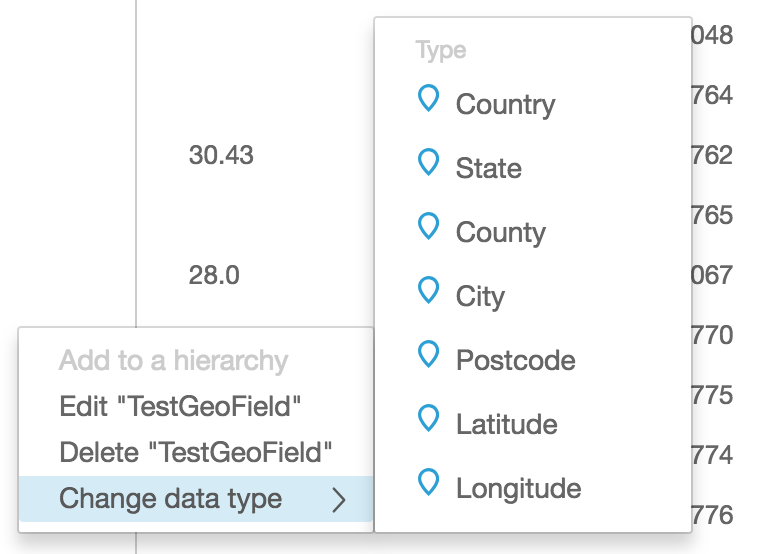
Once you have Latitude and Longitude fields, you’ll be able to visualise them on the map charts built in to QuickSight.

Quick Tip – using unix timestamps or epochs in QuickSight

It’s not uncommon for IoT Devices to send timestamp information in simple integers like a unix timestamp or epoch. For example, the time of 10/08/2018 @ 1:05am (UTC) is represented by the epoch 1538960714 which is the number of seconds since Jan 1st 1970. Sometimes we might also have this in milliseconds, such as when we use an IoT Core Rule to add a timestamp to the incoming message.

If I have an AWS IoT Analytics Data Set containing epoch seconds or milliseconds, I’ll find it difficult to use that data effectively in Amazon QuickSight which really needs to have a date type column in order to consider it as a time. What to do?

This is where QuickSight’s ability to have calculated fields comes to the rescue.

Click on New field and then give your new field a name such as epochDate. Then you want to use the epochDate built in function to convert your epoch seconds or milliseconds data into the right format.

In this example my messages contain a field called received which is in epoch milliseconds, and so I’m dividing that by 1000, converting the result to an integer (required by the epochDate function) and then returning the result of the epochDate() function.

epochDate(decimalToInt({received}/1000))


Quick Tip – Dataset SQL – don’t forget __dt

When you create a Data Set with IoT Analytics, the default SQL query that is shown in the SQL editor is something like this;

SELECT * FROM datastore

Whilst there’s nothing wrong with this as a starting point, it’s important to realise that an unconstrained query like this will do a full table scan of your data every time it is executed. That may be OK if you have a short retention period configured for your datastore and you only have a few thousand messages, but imagine having terabytes of data stretching back over years and really you only want to get data for the last few days? The query above may work (it may also time out), but it’s vastly inefficient and you’ll be paying for the privilege of scanning the entire data store every time.

There is a better way.

Your first starting point should always be to use a WHERE clause referencing the system provided __dt column. For ‘dt’, think ‘datetime’ because it is this column that gives you access to the time based partitions that help you make queries on IoT Analytics and the double underscores are used to avoid clashes with any attribute names in your own data.

Here’s an example that just looks at data from the past day.

select * from telescope_data where __dt >= current_date - interval '1' day

__dt has a granularity of 1 day so if you want to look at a narrower time-range, you would add a constraint on whatever timestamp column you had in your data, but always, always, always include the __dt constraint as part of your where clause to maximise query performance and lower query cost.

For example, what if we just want data from the last 15 minutes in our query results?

select * from telescope_data where __dt >= current_date - interval '1' day 
and from_unixtime(epoch) > now() - interval '15' minute

Notice that we have the __dt clause to restrict data to the most recent day and then have a clause based on the epoch reported in each message to further restrict to the last 15 minutes.

Adding a timestamp to messages from devices that have no clocks

Small remote sensors may not send a timestamp with every message and this can make later processing and analysis a challenge. Typically you want to think of IoT Data as being a time-series and there’s a bit of a clue in that name.

So how do we cope with messages that don’t have any hint of a timestamp?

This where the power of the IoT Core Rule comes to play. You will recall that so far we’ve seen rules that look like this;

SELECT * FROM 'rtjm/#'

This rule selects everything arriving on the rtjm/# topic space and sends it on to the destination. But what if we extended this to add in additional information? For example, we can add in the arrival time of the message like this;

SELECT *,timestamp() as received FROM 'rtjm/#'

We’re still using the * as before, but now we’re adding the current timestamp and naming it as a new attribute –  ‘received’ – in the message. Sorted!

That’s not all though. What about passing on the topic the messages are received on as well? This can be useful if your device id is contained in the topic rather than the payload of the message for example. How about this for example;

SELECT *,topic() as full_topic, timestamp() as received FROM 'rtjm/#'

This is just scratching the surface of course, for a full list of the capabilities, head on over to the AWS IoT Core documentation on SQL

Quick Tip – Channels without topic filters

The Create Channel workflow in the IoT Analytics Channel encourages you to specify an MQTT Topic Filter to listen for messages – but did you realise this is completely optional?

Just click directly on the Create Channel button without entering anything on this page and the Rule won’t be created for you. You can choose to setup a Rule later in the IoT Core Console or if you are not using MQTT at all, you can simply send your data to the Channel using the batch-put-message API from the programming language of your choice.