Saving cats with IoT : Part Two

The basic solution we’re going to build here is as follows (see part one for more information)

1) Build the project into a box using an ESP8266 and a VL53L0X time of flight sensor.

2) Send array of 320 distance measurements for any 16 second period where someone may have crossed the laser. Why 320? arbitrary, I was plotting the moving average on a TFT screen in version 1 and it had 320 pixels across …

3) Data is sent to AWS IoT Core and then a Rule Engine Action sends to AWS IoT Analytics.

4) Every hour, run a query on IoT Analytics to pull the last 14 days of measurement data. Doesn’t have to be 14 days, or run every hour, but that’s what I’m using.

5) Trigger a container dataset that executes the custom analysis when the SQL dataset has completed, this is the Jupyter notebook that will parse the data extracted in 4) and determine if we need to alert anyone about the cats or not.

The SQL query for (4) looks like this;

The output from the notebook, which shows a heat map of activity along with the most recent door crossing looks like this;

Using IoT to save Cats – what the internet was made for!

My wife had a cheery thought the other week, “How to do we provide for our cats when we’re gone?” This turned into a discussion of what would happen if we were both run over by a bus or died in a plane crash – who would feed the cats before it was too late? Morbid as it may be, there is a real problem to solve here as cats can only survive a matter of days without water and hepatic lipidosis can be kill a starving cat in just a few days too – so there’s actually quite a narrow window for help to arrive, and as we both live thousands of miles from our families, there are several scenarios that could mean help wouldn’t arrive until after it was too late.

So what to do?

Well, turn to IoT of course! I now have a challenge – how do we alert friends and family to the urgent cat peril should the worst happen? After ruling out various camera related options, pressure sensors under food bowls and water level sensors, I arrived at the simple conclusion that provided we could detect humans crossing into the kitchen, where the cat food is, then we could assume that all was well (when we’re away on vacation, we have cat sitters that look after the house and the cats).

Now that we’ve turned the problem into one of how to detect humans entering the kitchen, it’s much more fun. At first I was tempted to use an ultrasonic range detector to determine if people were walking through the kitchen door, but in theory cats can hear the ultrasonic frequencies concerned and whilst our 2 cats didn’t seem to notice it at all, rather than cause them any long term stress I went looking for another option.

Enter the tiny VL53L0X time of flight sensor that can measure accurately distances up to about 1200mm, which is perfect for measuring whether someone is coming through a doorway or not.

Using an ESP8266 based MCU from Adafruit, I soon had the sensor all packaged up in a small project box and secured to the kitchen door. As you can see, I put the power connector on the wrong side of the box (or the window for the TOF sensor, depending on how you look at it) – but it’s connected up and works a treat. As you can see, Mette the cat is most impressed!

The software on the Micro-controller calculates and stores the moving average of the reported distance in front of the sensor every 50ms for 320 samples (so 16 seconds of time). If it detects that something has happened, it sends all 320 samples to AWS IoT for additional analysis, otherwise it sends nothing to save on data that isn’t useful.

Plotting the data that arrives when something has been detected results in graphs a bit like this;

Notice how the observed distance is typically around 900mm (the distance across the door) but when someone walks in front, there is an easily recognisable pulse that we can use to state that someone has walked in or out of the kitchen – and since that is where the cat food lives, we can make the further assumption that someone is feeding the cats.

Interestingly, not all spikes are what you might think. Here’s one that happened when we were out of the house.

Notice that this time, the observed distance jumped UP and I think what happened here was that a glint of sun caught the sensor – so I’ll be tweaking my algorithm to ignore spikes that go in the wrong direction like this for the next iteration!

So, we have the basic technology in place, every time we think we’ve seen something cross in front of the sensor, we’ll send the data to AWS IoT – but how do we use this to save our cats? In part two we’ll cover how we used AWS IoT Analytics to build the workflow that keeps track of when the cats might have been last fed and alerts key people if something is not as it should be.

The Garden of Tomorrow – Architecture and workflows

In an earlier blog, I showed the video of my automated garden irrigation system that is powered by a couple of IoT devices with the control logic being handled by AWS IoT Analytics. In this post I’ll go a bit deeper into how it all works.

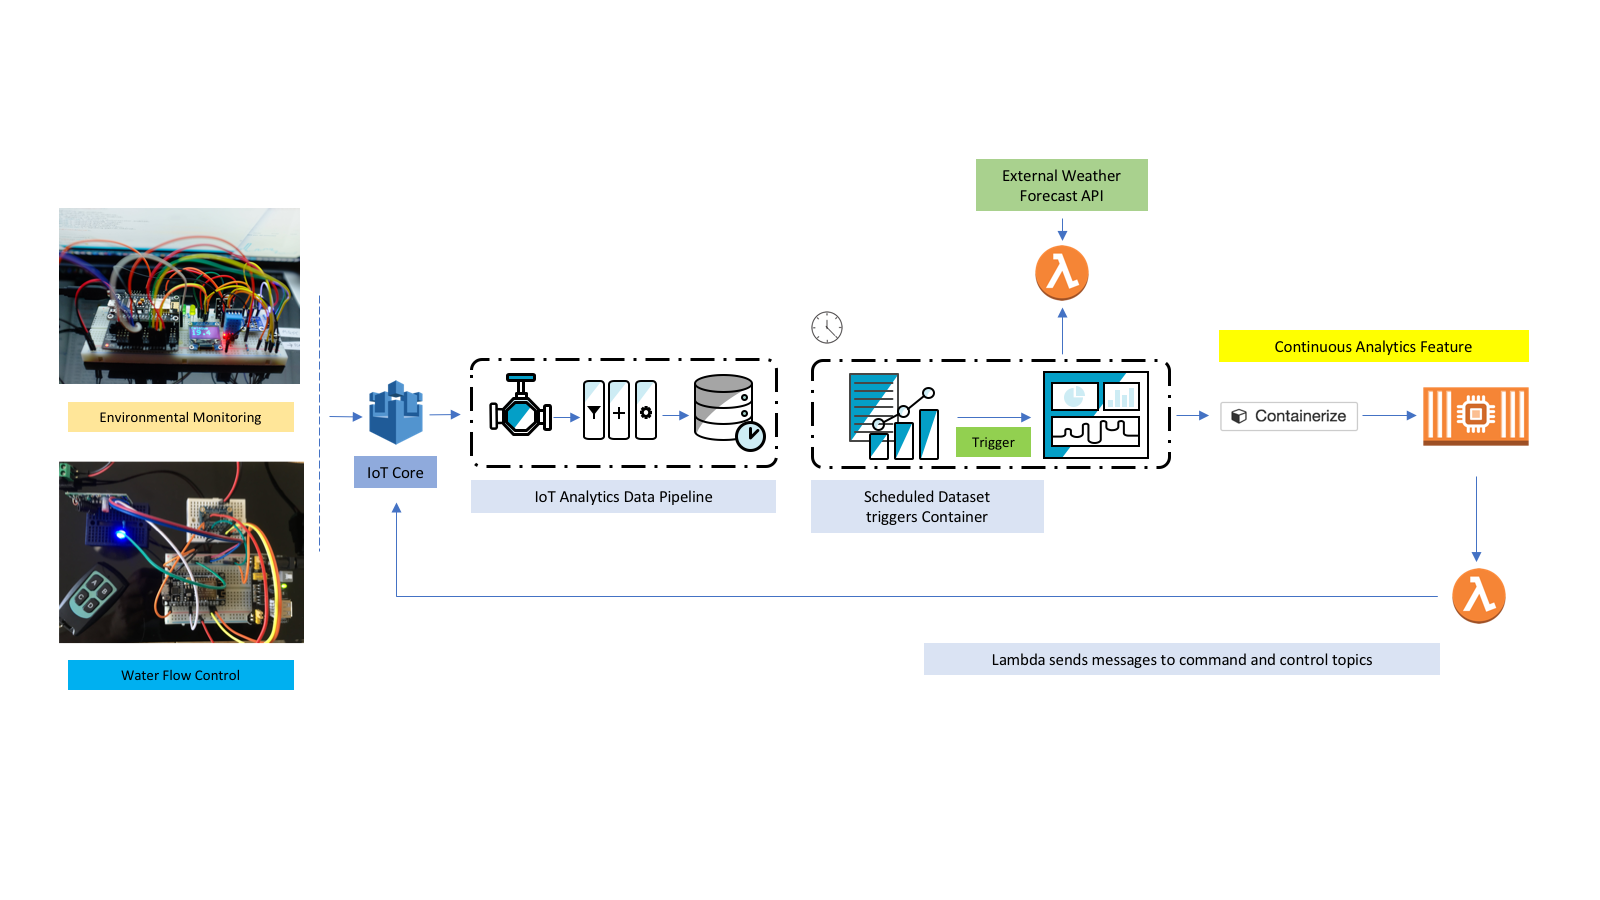
The overall system architecture looks like this – I have 2 micro-controllers powering the system, one handles all the environmental monitoring and one handles the flow of the water. I could do it all with a single micro-controller OK, this is just how my system happened to evolve. In both cases I’m using the ESP8266 and the Arduino IDE to write the code.

The problem can be broken down into getting the data, analyzing the data and then taking the appropriate actions depending on the analysis. In this project I’m going to use CloudWatch Rules to trigger Lambda Functions that control the water flow and use the Analysis to configure those Rules.

Data Sources
  1. Environmental sensor data on illumination & temperature
  2. Flow rate data from the irrigation pipe
  3. Future weather forecast data from darksky
Analysis
  1. Determine when to start watering by looking at the past illumination data
  2. Determine how much water by looking at the past temperature data
Command and Control
  1. Configure CloudWatch Rules to Trigger Water_On and Water_Off Lambda
  2. Send SNS notifications of planned activity
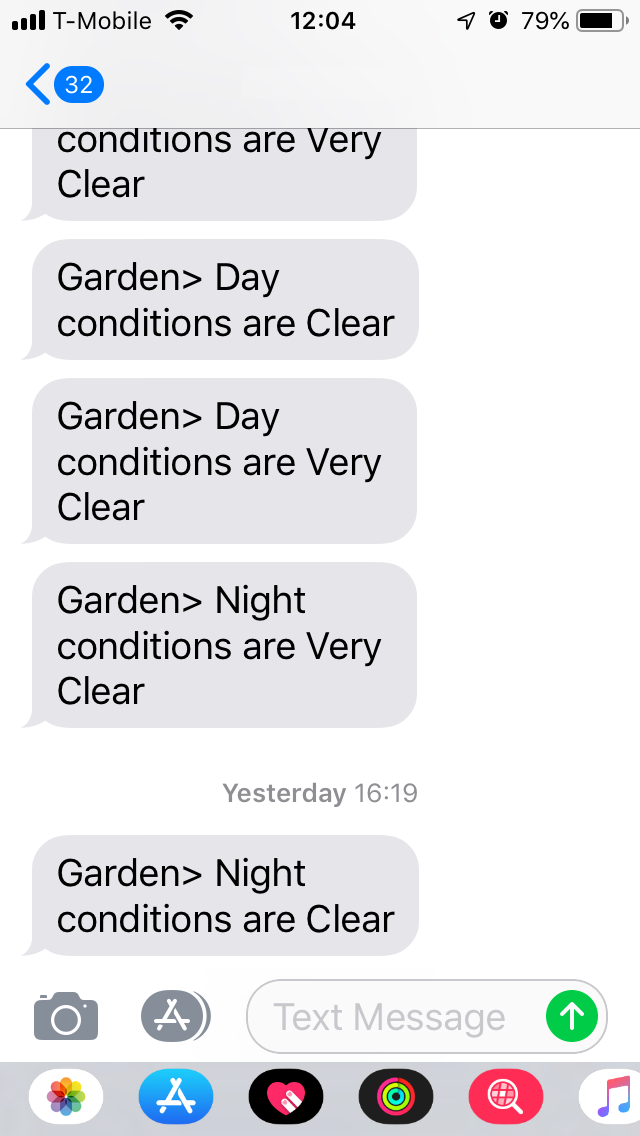
  3. Send SNS alarms if the water is flowing when it should not be

Before diving in to the analysis, a few words on where and how I’m storing all my device data.

My devices publish sensor data on a variety of MQTT topics, a sub-set of the topics I use would be;

rtjm/<DEVICEID>/weather/temperature
rtjm/<DEVICEID>/weather/humidity
rtjm/<DEVICEID>/photoresistor
rtjm/<DEVICEID>/infrared
rtjm/<DEVICEID>/barometer/pressure
rtjm/<DEVICEID>/barometer/temperature

The messages on all the topics are somewhat different, but typically contain a timestamp, a measurement and other small pieces of information.

I send all this data to a single channel and store it all in a single data store as I will use SQL queries in datasets and Jupyter Notebooks to extract the data I want.

The Analysis

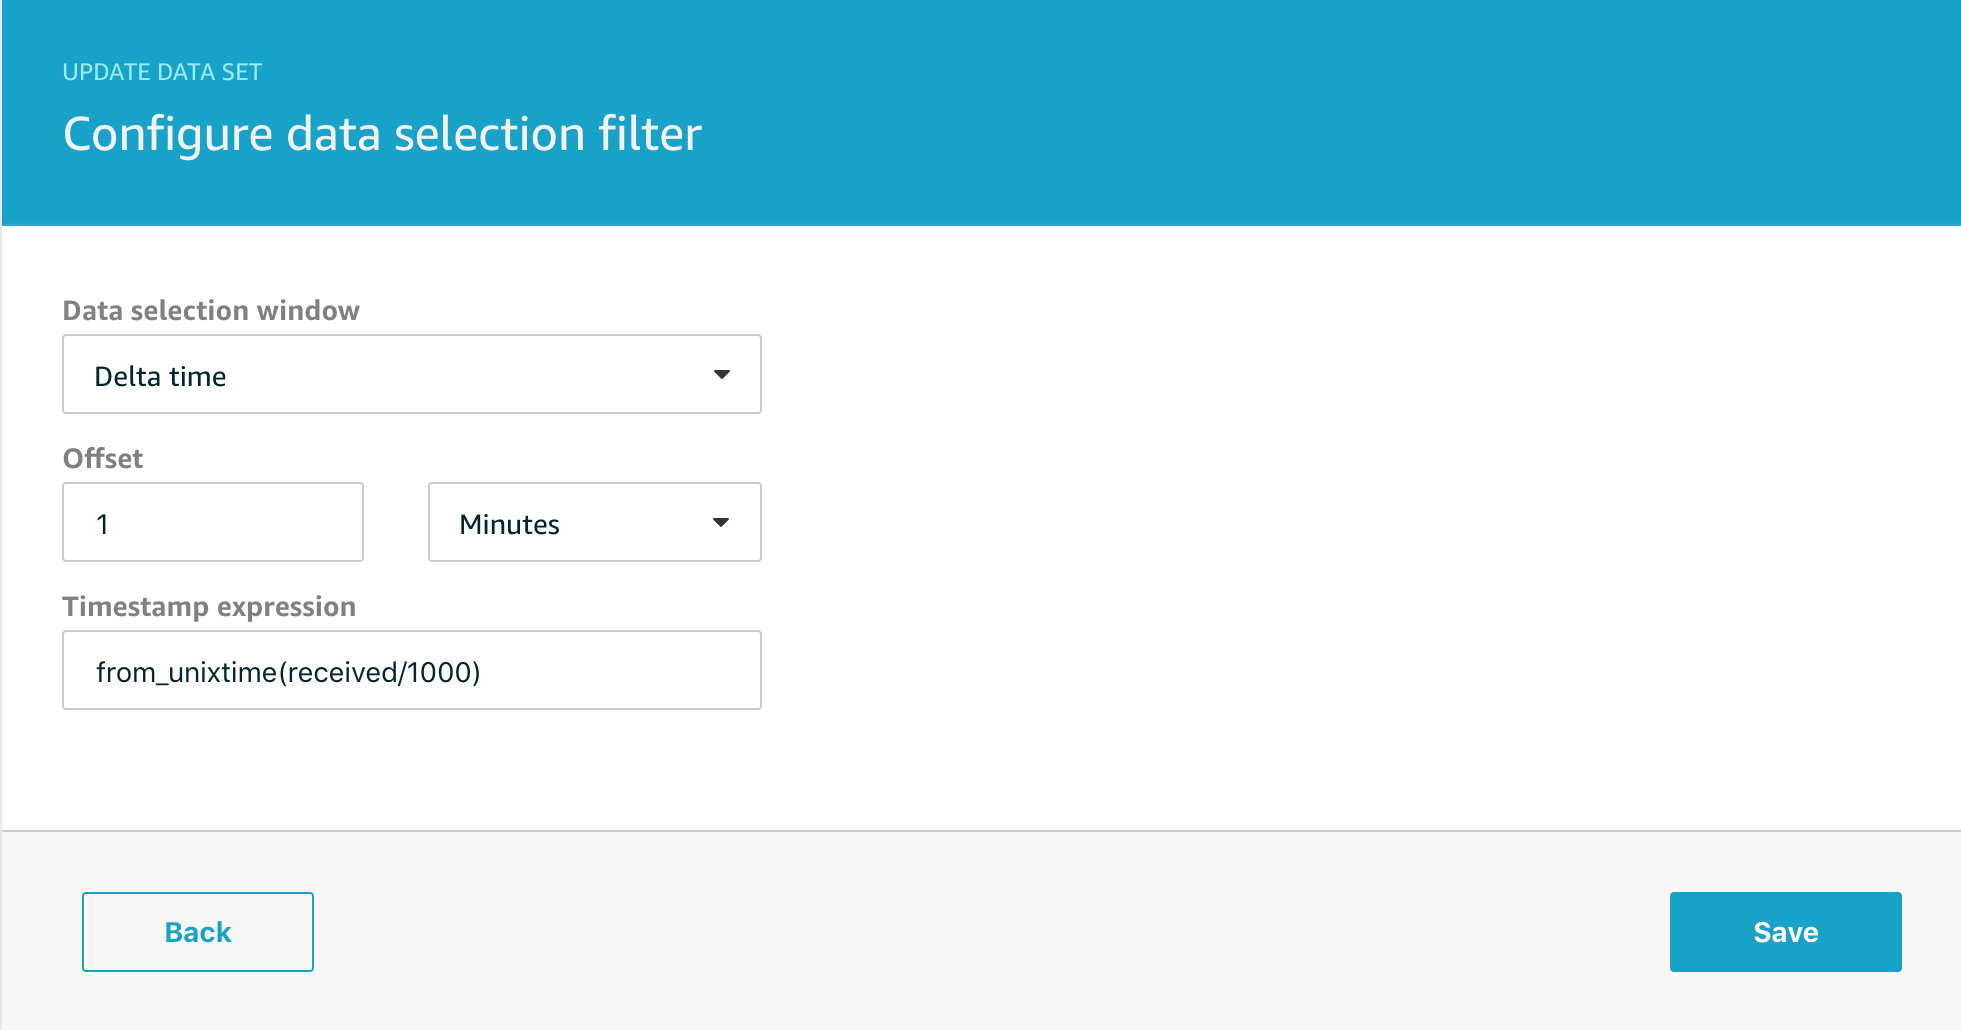
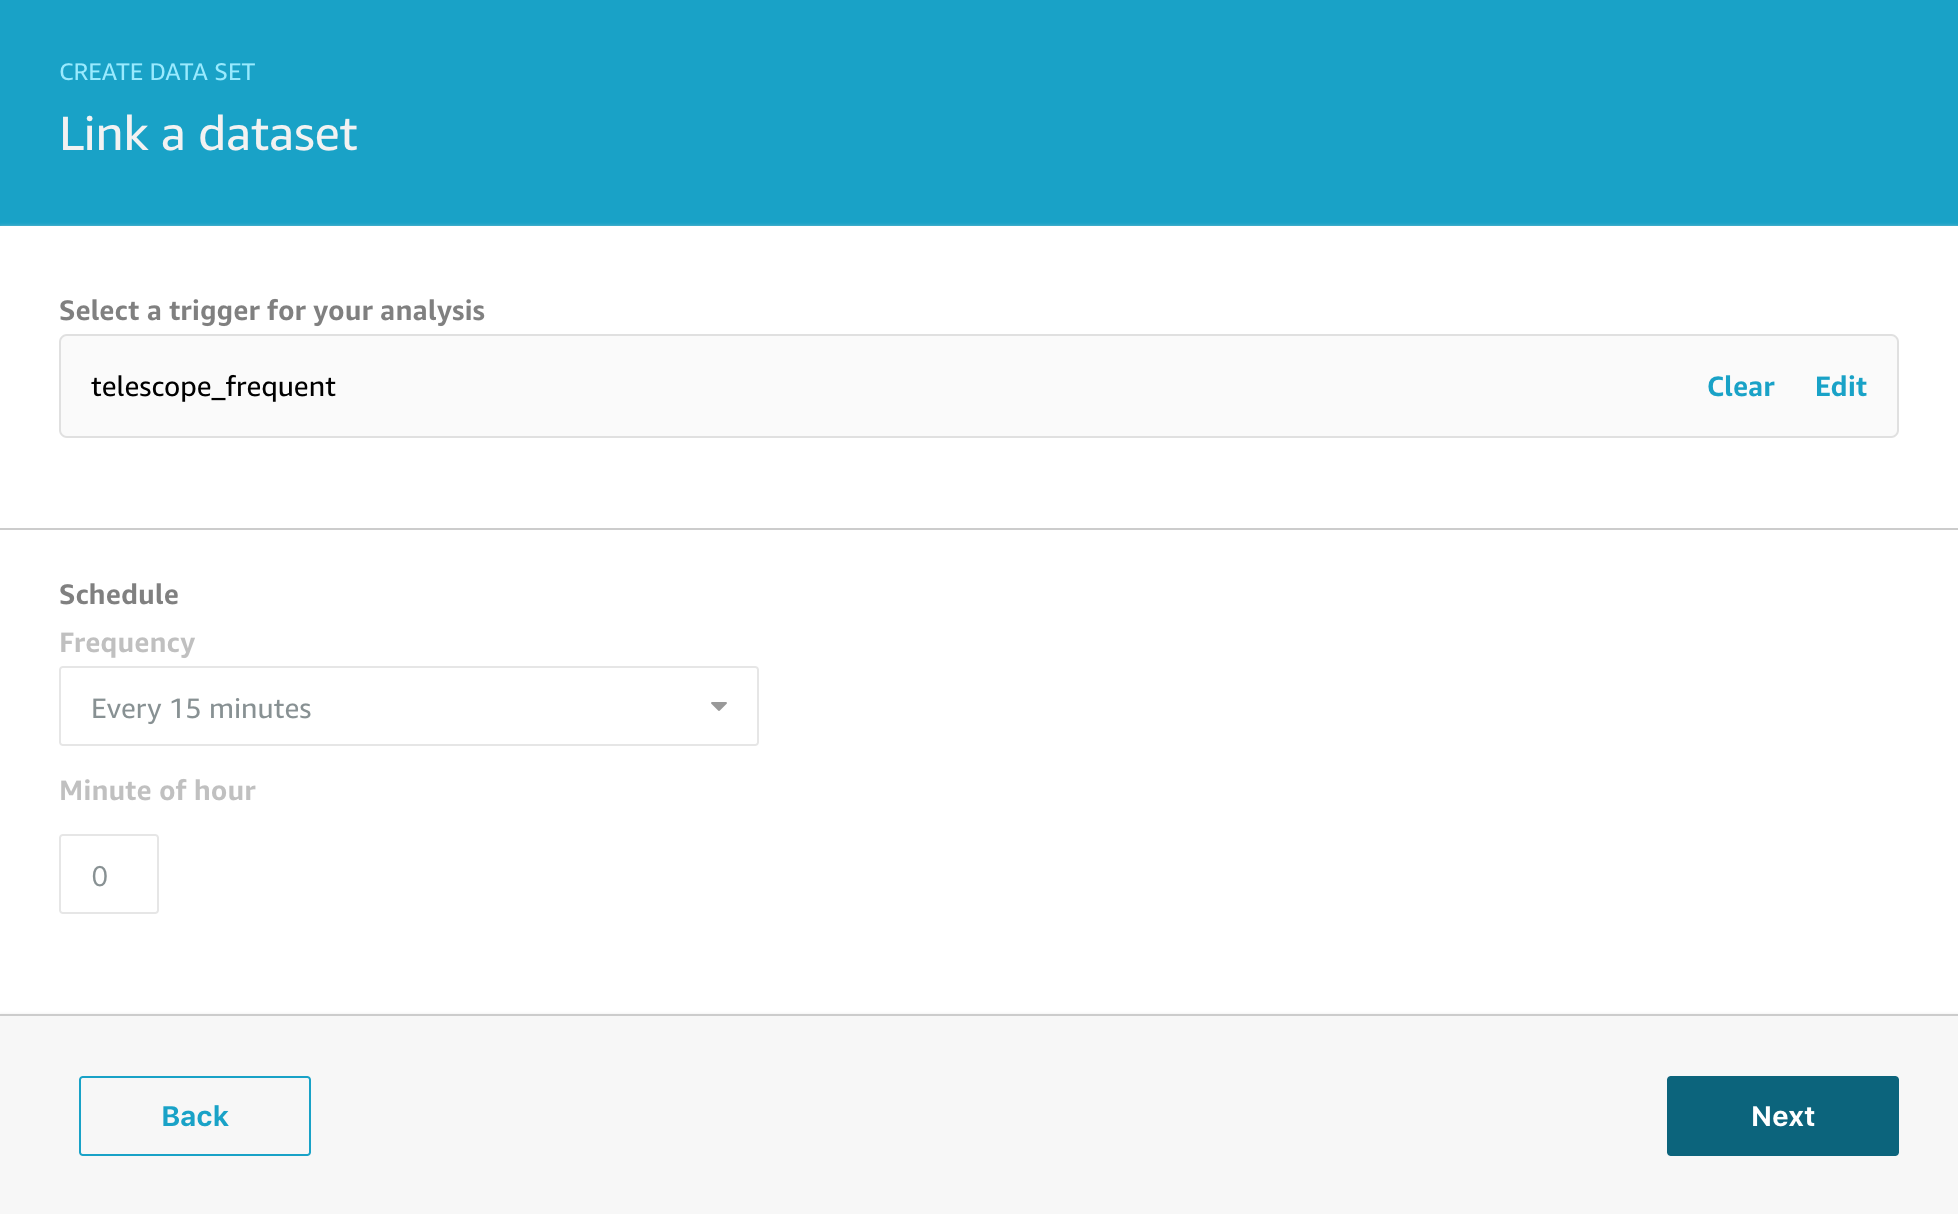
The first step is to create data sets to collect all the data for the period we will analyze in the notebook. I’ve chosen to use 1 data set for the temperature data and another data set for the illumination data, but it would be equally possible to use a single data set with the right query.

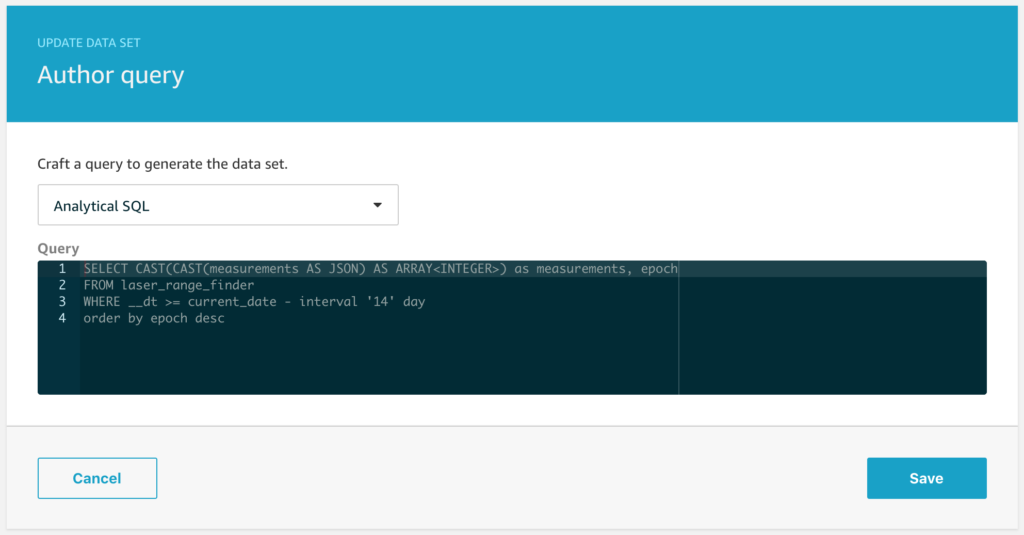
What does my temperature data set look like?

SELECT * FROM telescope_data where __dt >= current_date - interval '7' day AND (unit='Celcius' OR unit='C') order by epoch desc

What does my illumination data set look like?

SELECT * FROM telescope_data where __dt >= current_date - interval '7' day AND unit='lumen' order by epoch desc

I’ve set both data sets to execute daily as the preparation step for the next stage of analysis.
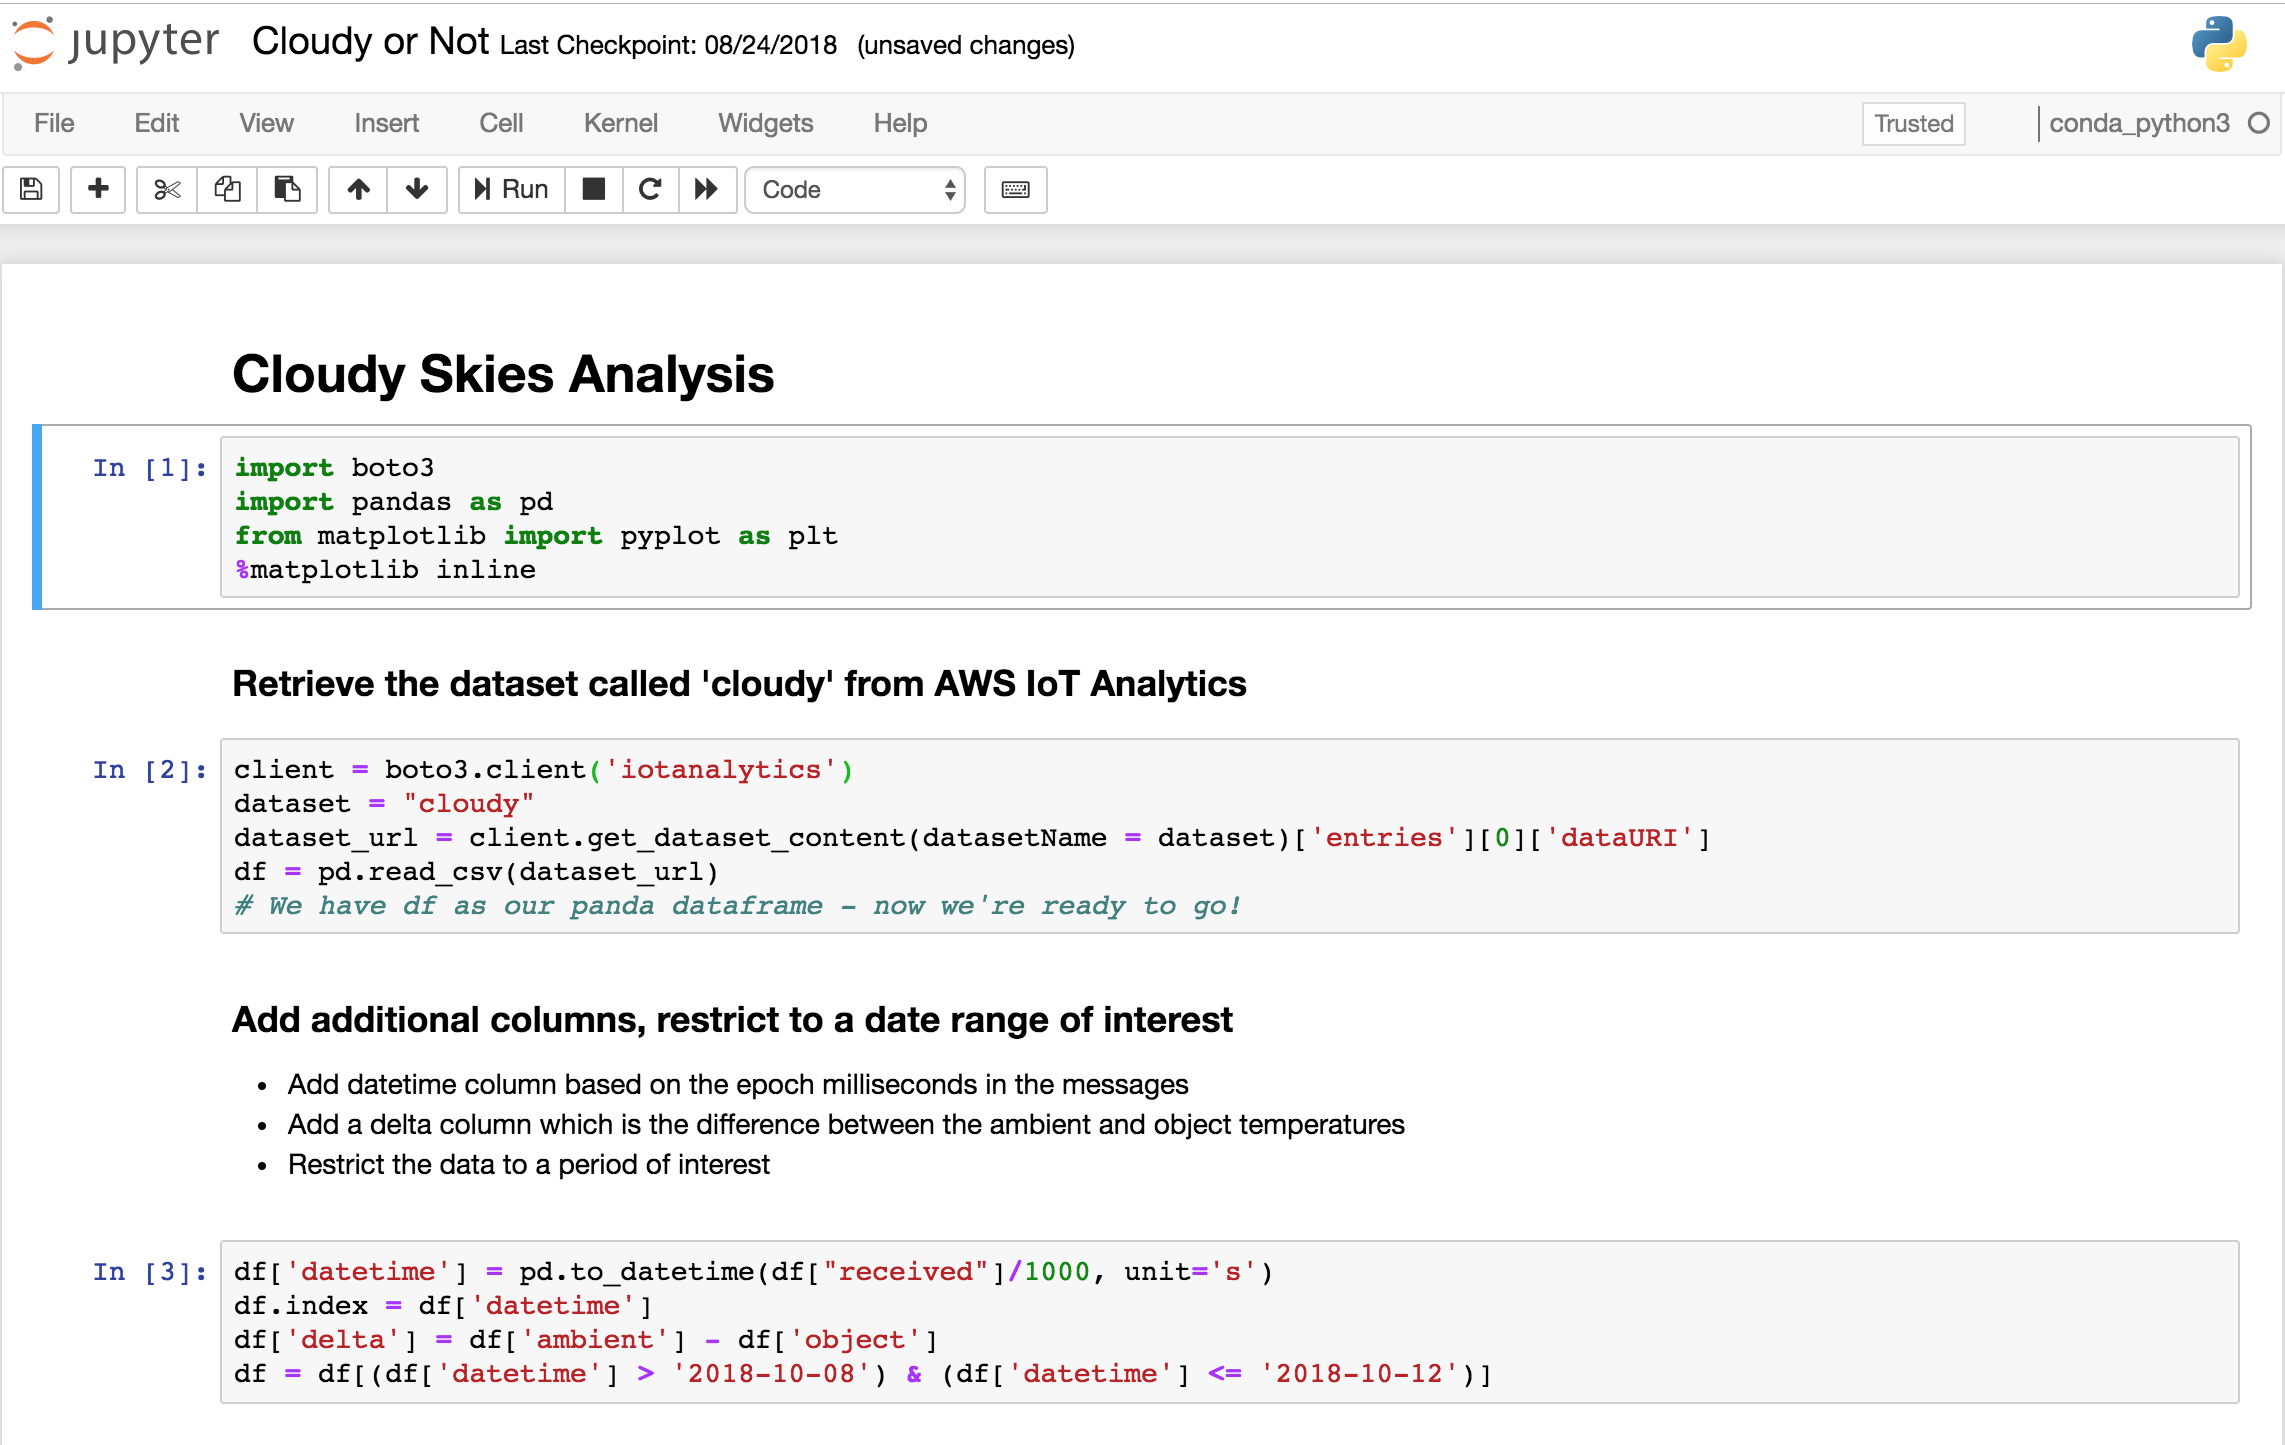
The Notebook

The crux of this entire project is the Jupyter Notebook, so we’re going to look at that in some detail. The full code for the notebook is available here.

Let’s start with the basics, to read the contents of a dataset, we can use some code like this;

iota = boto3.client('iotanalytics')
dataset = "illumination"
dataset_url = iota.get_dataset_content(datasetName = dataset,versionId = "$LATEST")['entries'][0]['dataURI']
df_light = pd.read_csv(dataset_url,low_memory=False)

This reads the latest version of the dataset content (every time the dataset is executed, a new version will be generated) for the dataset called illumination and reads it into a panda dataframe called df_light.

df_light['datetime']=pd.DatetimeIndex(pd.to_datetime(df_light["received"]/1000, unit='s')) \
    .tz_localize('UTC') \
    .tz_convert('US/Pacific')

df_light.index = df_light['datetime']

This adds a datetime index to the dataframe using the ‘received’ column in the data and converts it to the appropriate timezone.

Next we do some analysis with this data to figure out when dawn is and when we should turn the water on. I’m not going to explain this in detail as really the analysis you will be doing is totally dependent on the actual problem you want to solve, but you can review the code for the notebook here.

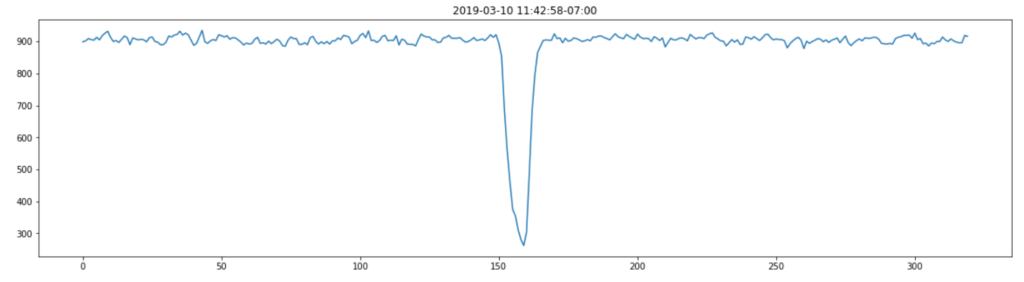
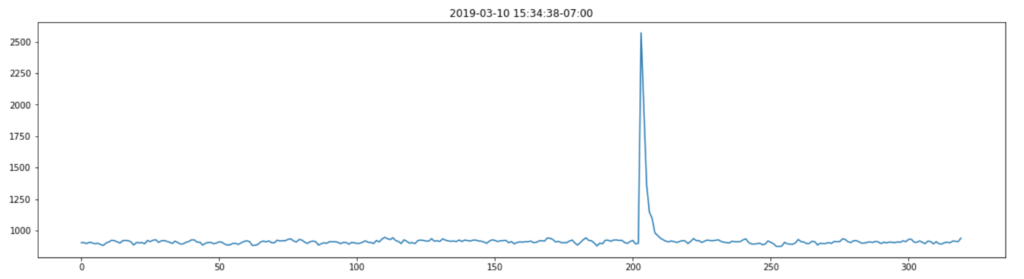
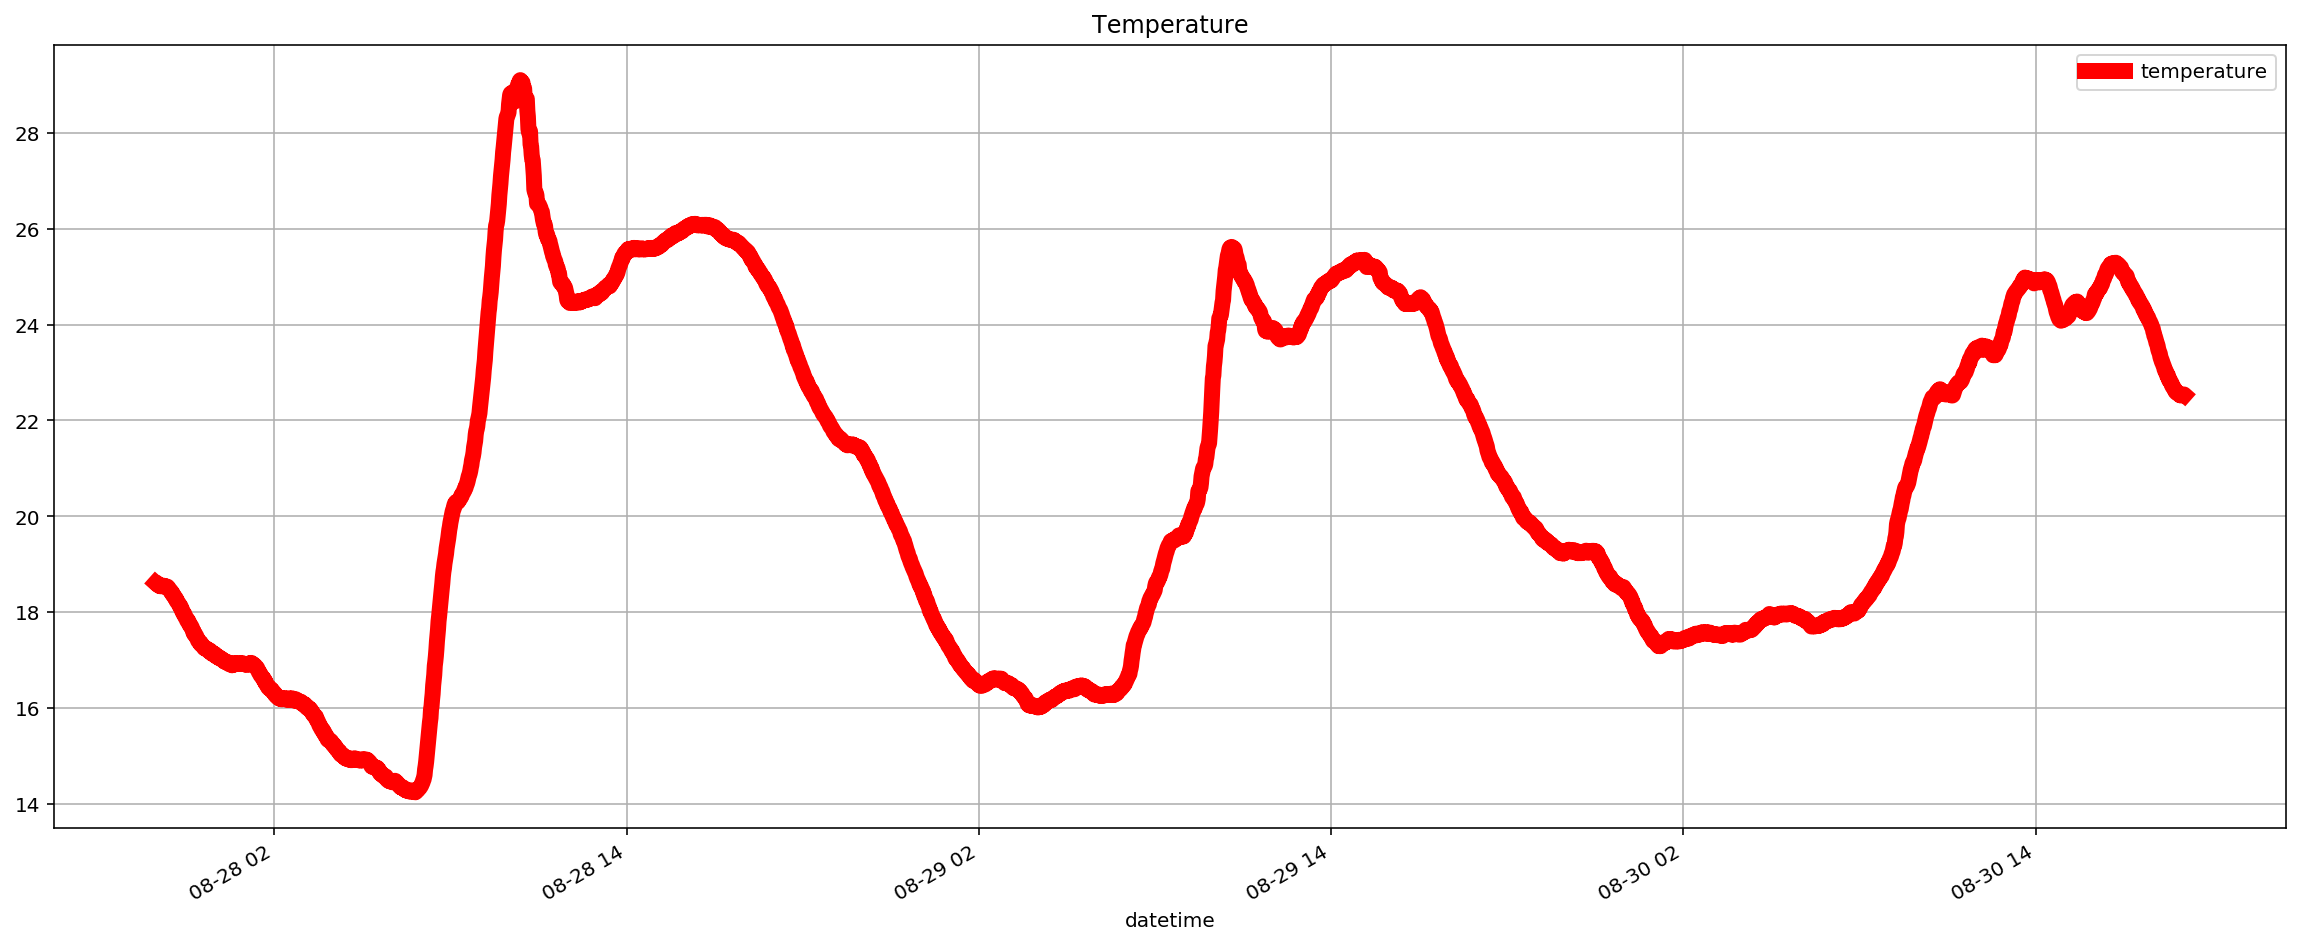
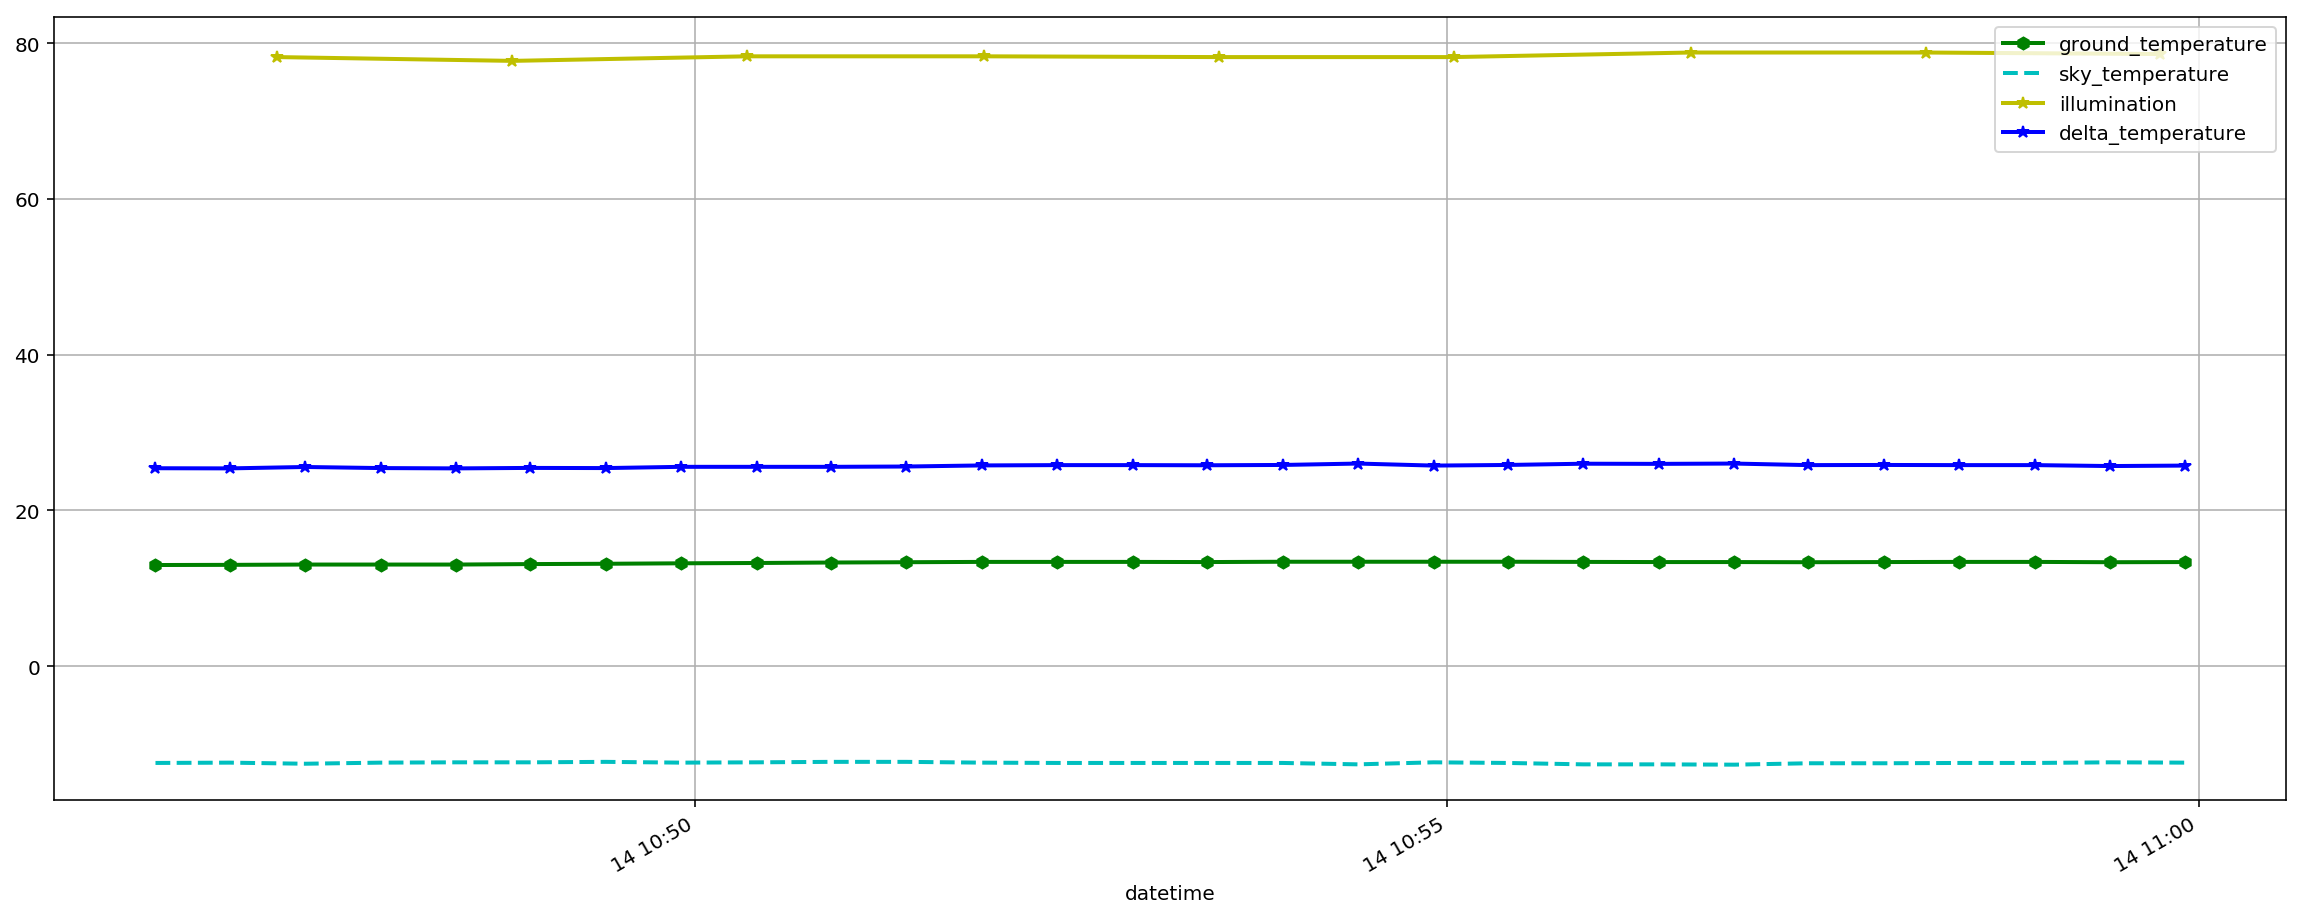
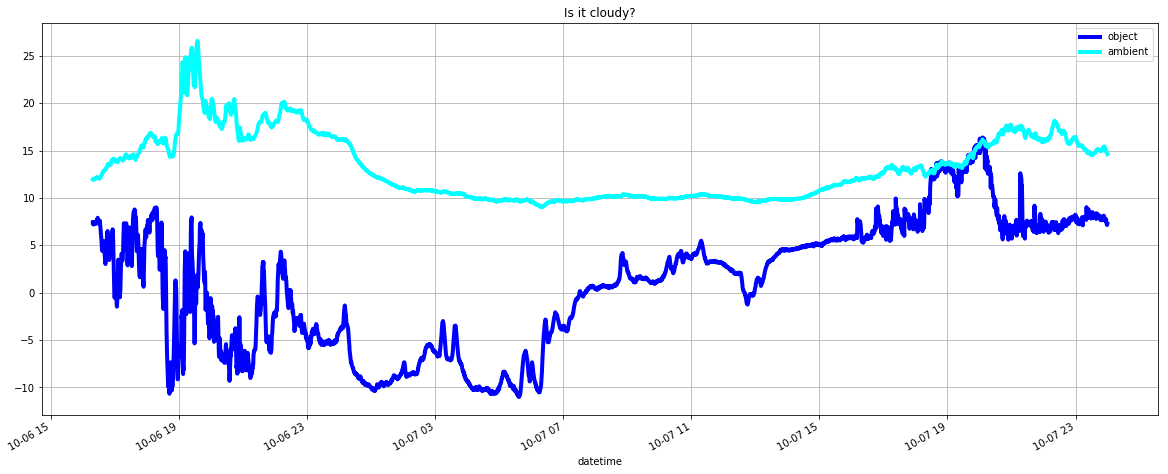
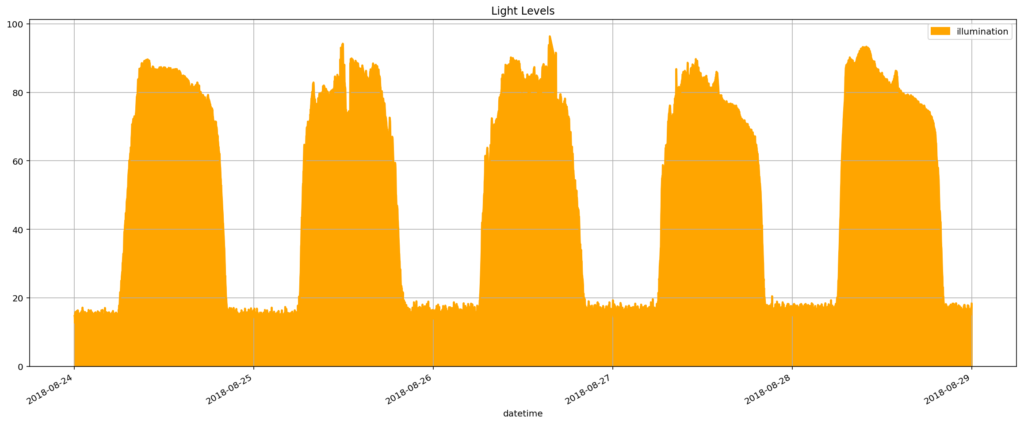
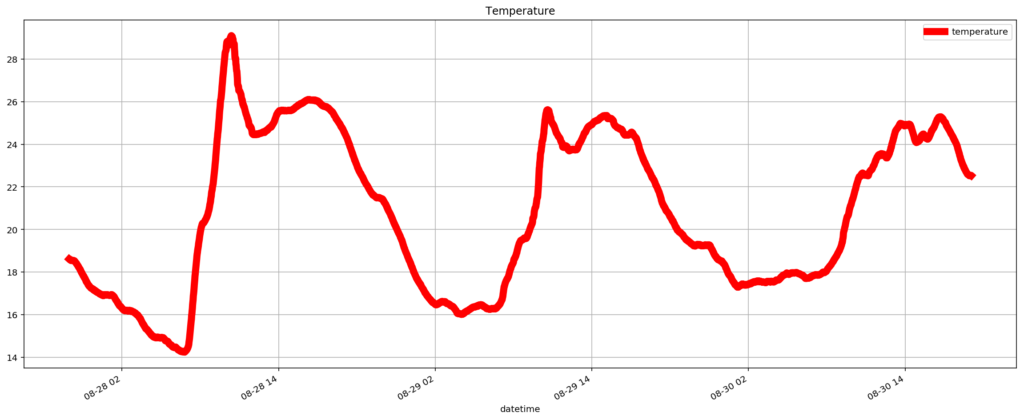
Typically in my notebooks I plot the data I am working with so I can visually inspect whether the data aligns with my expectations. Here’s the illumination data plotted by the notebook for example;

And here’s the temperature data from the other dataset.

Looking at the notebook code, you’ll see that we distill this data down to a time to turn the water on and a time to turn the water off.

water on (local)= 2018-08-23 06:06:10
water off (local)= 2018-08-23 07:31:10

You will recall I mentioned we would look at the weather forecast to determine if it was going to rain or not? How does that work?

lambdaClient = boto3.client('lambda')
response = lambdaClient.invoke(FunctionName='IsItGoingToRain')
result = json.loads(response['Payload'].read().decode("utf-8"))
willItRain = result

I’ve encapsulated the ‘IsItGoingToRain’ into a Lambda function that is executed by the notebook and this beings me to an important but sometimes overlooked point – I can use the entire AWS SDK from within my notebook and this gives me a great deal of flexibility to design a solution that leverages many other services. This lambda function is really simple, the code looks like this;

import json
from urllib.request import urlopen

def lambda_handler(event, context):
    url = "https://api.darksky.net/forecast/<REDACTED>/<LAT>,<LON>?units=si&exclude=currently,flags,alerts,minutely,daily"
    response = urlopen(url)
    weather = json.load(response)
    hourly=weather["hourly"]["data"]
    willItRain=False
    for hour in hourly:
        if ( hour["precipIntensity"] > 3 and hour["precipProbability"]>0.8) :
            willItRain = True
    return willItRain

Next the notebook leverages CloudWatch Event Rules to trigger another pair of lambda functions – one to turn the water on and one to turn the water off. Let’s take a look at the rule configuration to see how straight-forward that is as well.

ruleStatus = 'DISABLED' if (willItRain) else 'ENABLED'
cwe = boto3.client('events')

response = cwe.put_rule(
    Name='water-on',\
    ScheduleExpression='cron('+str(water_on.minute)+' '+str(water_on.hour)+' ? * * *)',\
    State=ruleStatus,\
    Description='Autogenerated rule to turn the water ON at the specified time')

response = cwe.put_rule(
    Name='water-off',\
    ScheduleExpression='cron('+str(water_off.minute)+' '+str(water_off.hour)+' ? * * *)',\
    State=ruleStatus,\
    Description='Autogenerated rule to turn the water OFF at the specified time')

The notebook goes on to publish the analysis back into another datastore, send messages to my phone etc, so please read the full notebook code here to get a sense of the variety of possibilities.

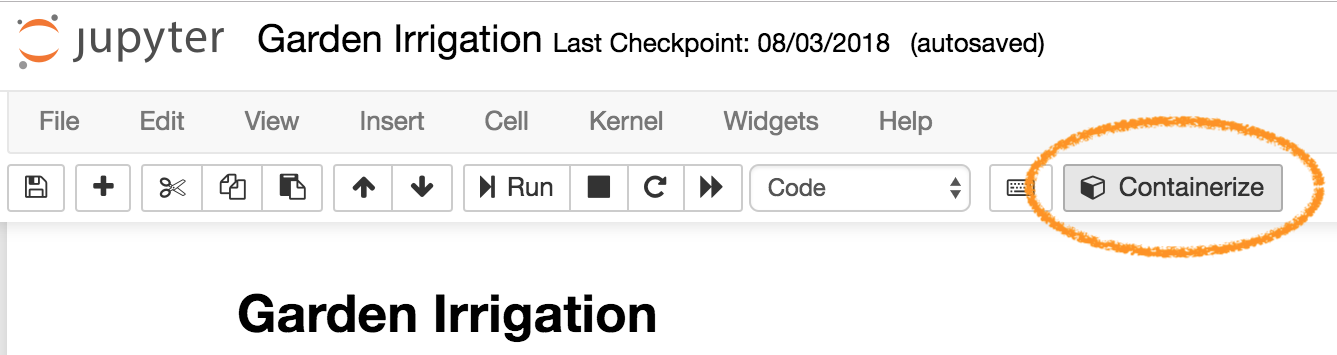
Great, so I have my notebook for analysis and I’ve tested it so that I’m happy, but how do I automate execution – it’s not very convenient having to manually run the notebook every time I want to adjust the irrigation and manual execution kind of misses the point of the project.

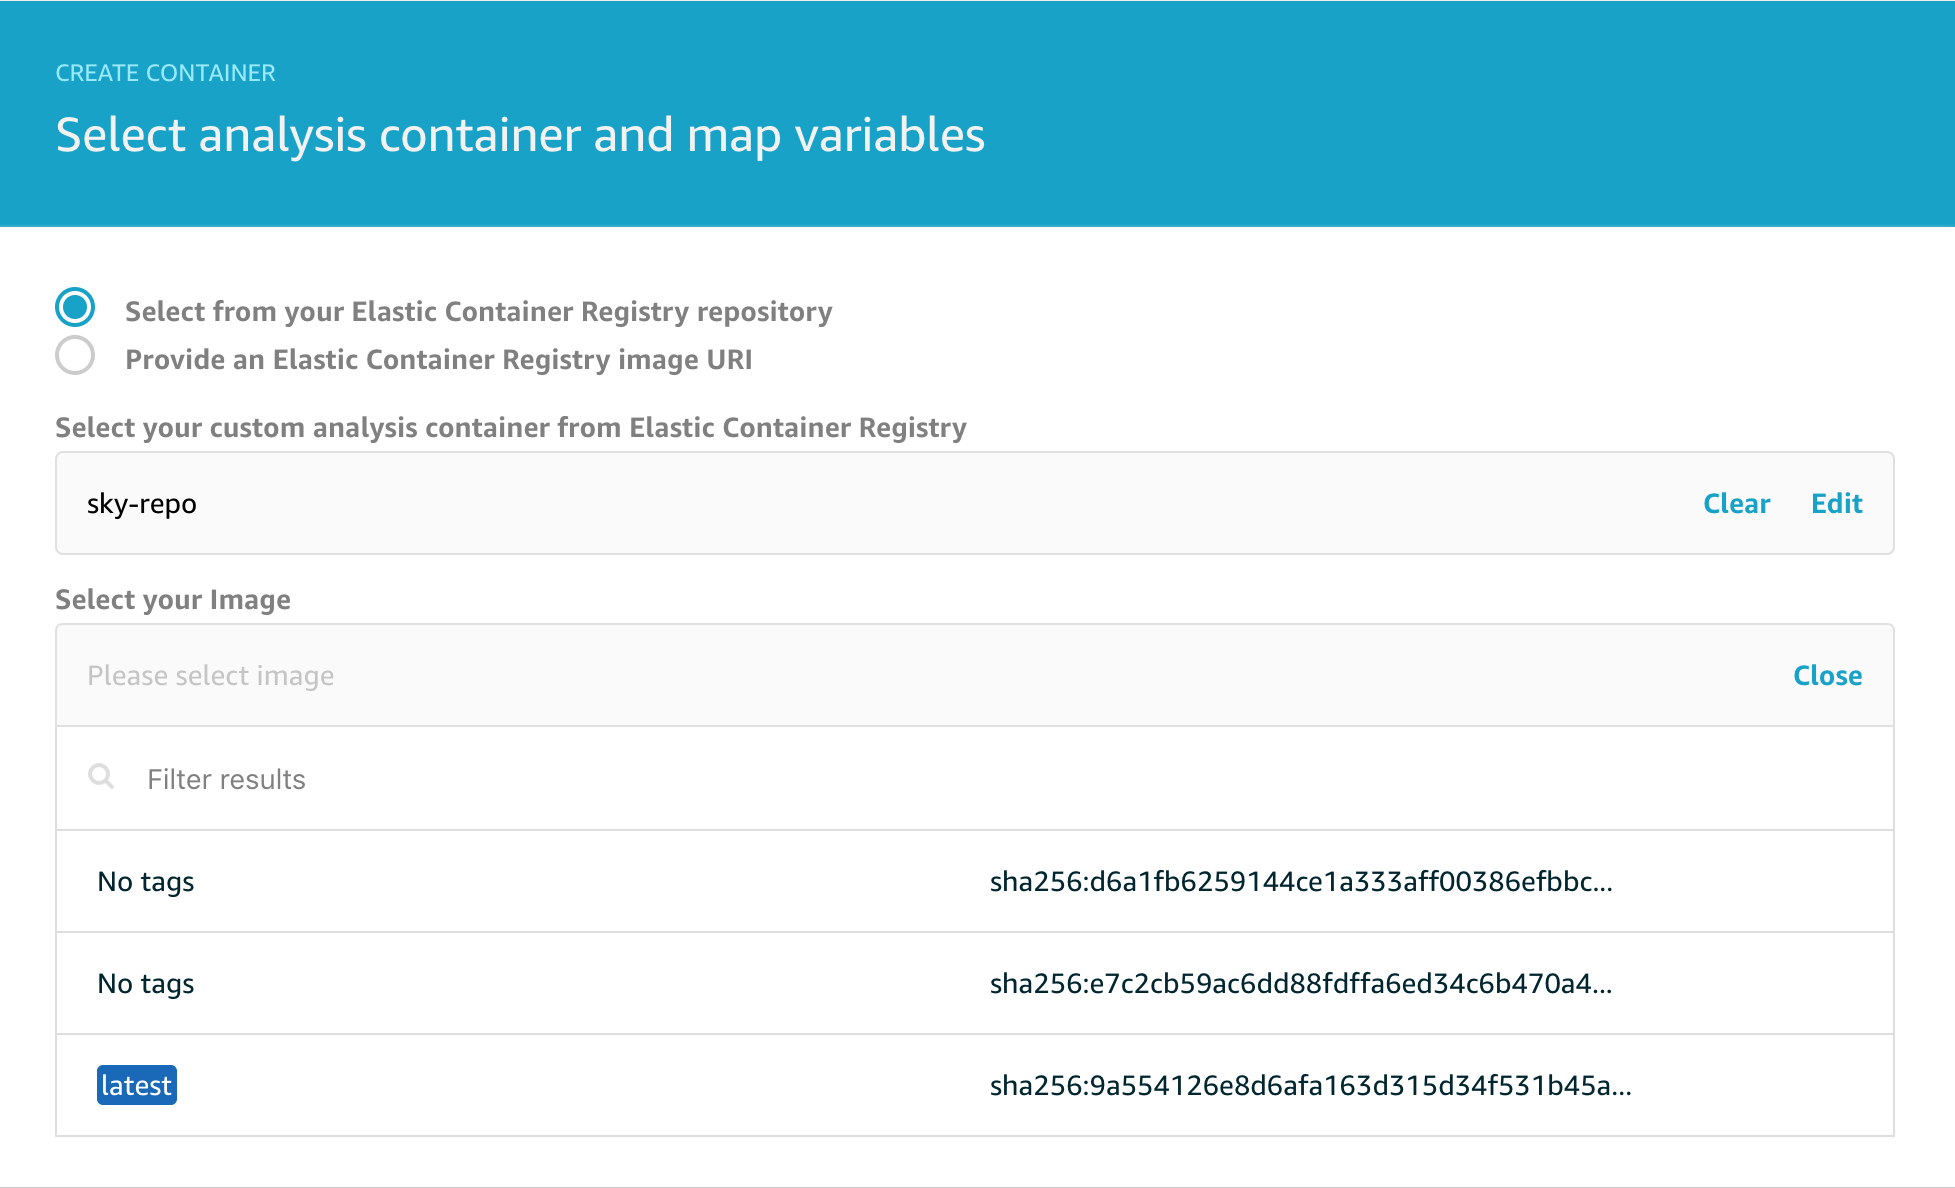
The key is to ‘containerize’ the notebook. This process is started by simply clicking on the containerize button you should see on the upper menu bar;

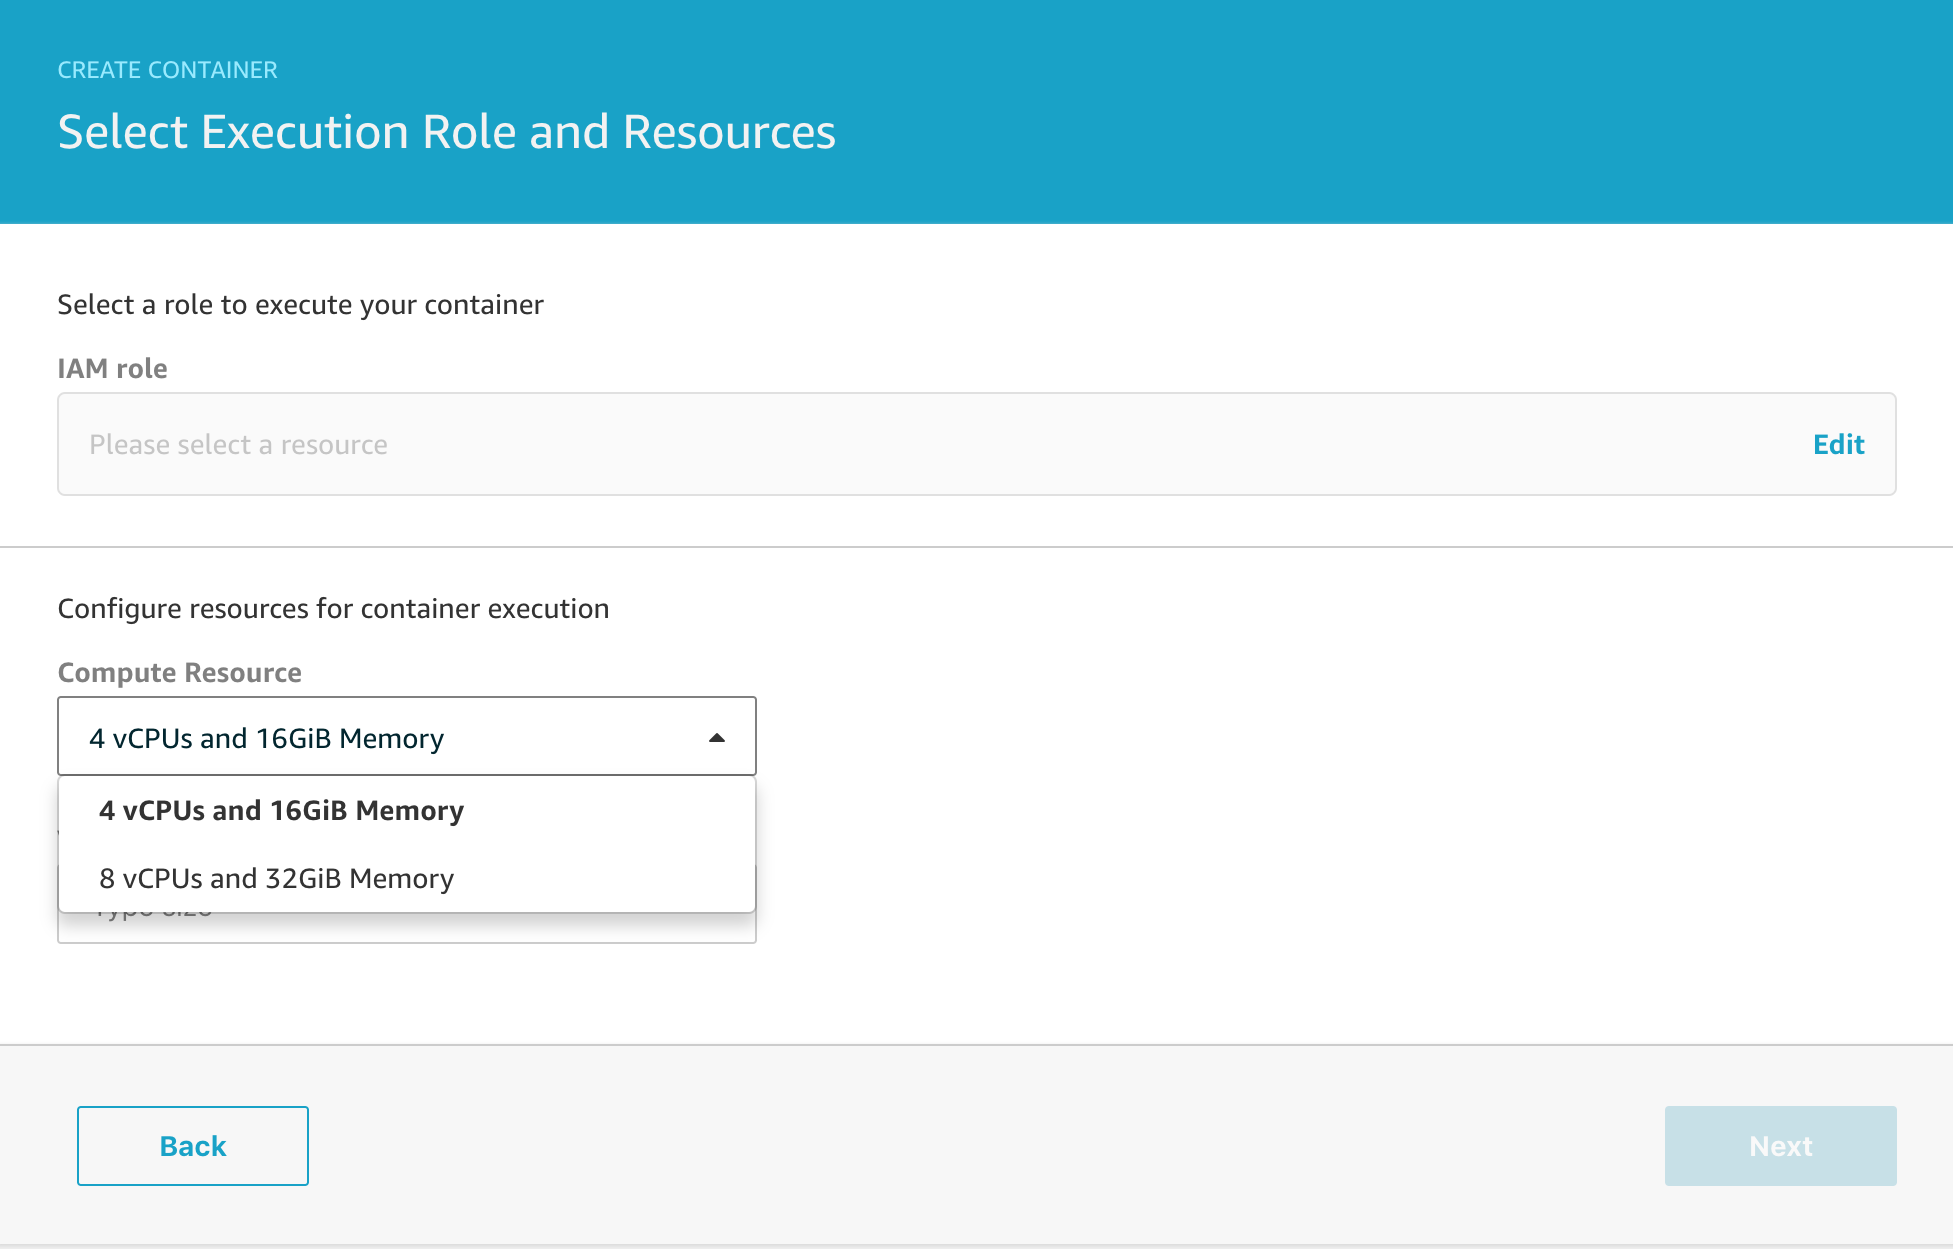
This process, launched at jupytercon 2018, allows you to package up your notebook into a docker image stored in an Amazon Elastic Container Registry repository and then you can use a container data set within IoT Analytics to execute the docker image on demand – either on a fixed schedule or triggered by the completion of another data set (which could be a SQL data set that prepares the data for the notebook).

The Result

Once a day my notebook is executed and determines when to turn the water on and off using both local environmental sensor readings and the weather forecast for the day ahead, the configuration drives CloudWatch Event Rules that invoke Lambda functions to turn the water on and off. The system has been up and running all summer without incident and the garden is still thriving.

UPDATE

Learn more about containerizing your notebook on the official AWS Iot Blog


Detecting clouds and clear skies (part three)

Last time we saw how we could take the the results of our cloud sensor data set and explore them using a Jupyter notebook.  Typically you use the notebook to implement the data science part of your projects but once you have the notebook ready, how do you run it automatically on a schedule?

First let’s start with the data science we would like to do. I’m going to do some analysis of my sensor readings to determine if it is night or day and if the sky is clear, has low or high cloud, or it’s raining (or snowing). Then, if conditions have changed since the last update, I’m going to publish a message on an SNS topic which will result in a message on my mobile phone for this example.

The first new feature I’m going to use is that of delta windows for my dataset.

In the last example, I scheduled a data set every 15 minutes to retrieve the last 5 days of data to plot on a graph. I’m going to narrow this down now to just retrieve the incremental data that has arrived since the last time the query was executed. For this project, it really doesn’t matter if I re-analyse data that I analysed before, but for other workloads it can be really important that the data is analysed in batches that do not overlap and that’s where the delta window feature comes in.

We will edit the data set and configure the delta time window like this;

The Timestamp expression is the most important option, IoT Analytics needs to know how to determine the timestamp of your message to ensure that only those falling within the window are used by the data set. You can also set a time offset that lets you adjust for messages in flight when the data set is scheduled.

Note that my Timestamp expression is;

from_unixtime(received/1000)

In many of my projects I use the Rule Engine Action SQL to add a received timestamp to my messages in case the device clock is incorrect or the device simply doesn’t report a time. This generates epoch milliseconds hence I’m dividing by 1000 to turn this into seconds before conversion to the timestamp object.

We’re going to make some changes to our Jupyter notebook as well, to make it easier to see what I’ve done, the complete notebook is available here.

First thing to note is that the delta window with a query scheduled every 15 minutes means we will only have data for a 15 minute window, here’s what a typical plot of that data will look like;

And here’s the ‘data science’ bit – the rules we will use to determine whether it is night or day and whether it is cloudy or not. Obviously in this example we could basically do this in real-time from the incoming data stream, but imagine that you needed to do much more complex analysis … that’s where the real power of Jupyter notebooks and Amazon Sagemaker comes to the fore. For now though, we’ll just do something simple;

mean = statistics.mean(df_delta)
sigma = statistics.stdev(df_delta)

sky='Changeable'

if (sigma < 5 and mean > 20) :
    sky = 'Clear'
if (sigma < 1 and mean > 25) :
    sky = 'Very Clear'
if (sigma < 5 and mean <= 3) :
    sky = 'Rain or Snow'
if (sigma < 5 and mean > 3 and mean <= 10) :
    sky = 'Low cloud'
if (sigma < 5 and mean >12 and mean <= 15) :
    sky = 'High cloud'

mean,sigma,sky

So we’ll basically report Very Clear, Clear, Rain or Snow, Low cloud or High cloud depending on the difference between the temperature of the sky and ground which is a viable measure of cloud height.

We’ll also determine if it is night or day by looking at the light readings from another sensor in the same physical location.

Automation

We can test our new notebook by running it as normal, but when we’re ready to automate the workflow we need to containerize the notebook so it can be independently executed without any human intervention. Full details on this process are documented over at AWS

Trigger the notebook container after the data set

Once you’ve completed the containerization, the next step is to create a new data set that will execute it once the SQL data set has completed.

Select Create Container and on the next screen name your data set so you can easily find it in the list of data sets later.

Now you want to select the trigger for the analysis. You don’t have to trigger the container execution from a data set, but it is quite a common workflow and the one we’re going to use today, so click Link to select the trigger from the 3 options below.

Next we have to select which data set we want to link this analysis to.

And then we need to configure the source container that will be executed.

Note that you can choose to deploy any arbitrary container from Amazon ECR but we’re going to choose the container we created earlier. Note that the latest image is tagged to help you locate it since typically you will want to run the most recent version you have containerised.

On the next page, note that you can select between different compute resources depending on the complexity of the analysis you need to run. I typically pick the 4 vCPU / 16GiB version just to be frugal.

The final step is to configure the retention period for your data set and then we’re all set.

Although there are a lot of steps, once you’ve done this a couple of times it all becomes very straight-forward indeed. We now have the capability to execute a powerful piece of analysis triggered by the output of the SQL data set and do this entire workflow on a schedule of our choosing. The automation possibilities this opens up are significant and go beyond my simple example of sending me a message when the weather changes locally.


Detecting clouds and clear skies (part two)

Last time we covered how to route data from a cloud sensor to IoT Analytics and how to create a SQL data set that would be executed every 15 minutes containing the most recent data. Now that we have that data, what sort of analysis can we do on it to find out if the sky is cloudy or clear?

AWS IoT Analytics is integrated with a powerful data science tool, Amazon Sagemaker, which has easy to use data exploration and visualization capabilities that you can run from your browser using Jupyter Notebooks. Sounds scary, but actually it’s really straight forward and there are plenty of web based resources to help you learn and explore increasingly advanced capabilities.

Let’s begin by drawing a simple graph of our cloud sensor data as often visualizing the data is the first step towards deciding how to do some analysis. From the IoT Analytics console, tap Aalyze and then Notebooks from the left menu. Tap Create Notebook to reach the screen below.

There are a number of pre-built templates you can explore, but for our project, we’re going to start from a Blank Notebook so tap on that.

To create your Jupyter notebook (and the instance on which it will run), follow the official documentation Explore your Data section and get yourself to the stage where you have a blank notebook in your browser.

Let’s start writing some code. We’ll be using Python for writing our analysis in this example.

Enter the following code in the first empty cell of the notebook. This code loads the boto3 AWS SDK , the pandas library which is great for slicing and dicing your data, and mathplotlib which we will use for drawing our graph. The final statement allows the graph output to appear inline in the notebook when executed.

import boto3
import pandas as pd
from matplotlib import pyplot as plt
%matplotlib inline

Your notebook should start looking like the image below – we’ll explain the rest of the code shortly.

client = boto3.client('iotanalytics')
dataset = "cloudy"
dataset_url = client.get_dataset_content(datasetName = dataset)['entries'][0]['dataURI']
df = pd.read_csv(dataset_url)

This code reads the dataset produced by our SQL query into a panda data frame. One way of thinking about a data frame is that it’s like an Excel spreadsheet of your data with rows and columns and this is a great fit for our data set from IoT Analytics which is already in tabular format as a CSV – so we can use the read_csv function as above.

Finally, to draw a graph of the data, we can write this code in another cell.

df['datetime'] = pd.to_datetime(df["received"]/1000, unit='s')
ax1 = df.plot(kind='line',x='datetime',y='object',color='blue',linewidth=4)

df.plot(title='Is it cloudy?',ax=ax1, \
                         kind='line',x='datetime',y='ambient',figsize=(20,8), \
                         color='cyan',linewidth=4,grid=True)

When you run this cell, you will see the output like this for example

Here’s all the code in one place to give a sense of how little code you need to write to achieve this.

import boto3
import pandas as pd
from matplotlib import pyplot as plt
%matplotlib inline

client = boto3.client('iotanalytics')
dataset = "cloudy"
dataset_url = client.get_dataset_content(datasetName = dataset)['entries'][0]['dataURI']
df = pd.read_csv(dataset_url)
df['datetime'] = pd.to_datetime(df["received"]/1000, unit='s')

ax1 = df.plot(kind='line',x='datetime',y='object',color='blue',linewidth=4)
df.plot(title='Is it cloudy?',ax=ax1, \
                         kind='line',x='datetime',y='ambient',figsize=(20,8), \
                         color='cyan',linewidth=4,grid=True)

Of course what would be really nice would be to be able to run analysis like this automatically every 15 minutes and notify us when conditions change, this will be the topic of a future post that harnesses a recently released feature of IoT Analytics  for automating your workflow and in the meantime you can read more about that in the official documentation.